Wednesday 9 May 2018

Final Puppets - Finn & April


Finn  


April


The Box - Set


Working with Nicolas Haquin - Music Student

Throughout this project, I have luckily been able to work very closely with a Leeds College of Music student, who I met at the mixer session at University. We have met up in person and been communicating through Facebook ever since and together we have worked really well and been able to get a great result.

Here was the original compositional ideas that Nicolas had. I really loved his ideas and told him to definitely carry on in that direction! I really liked the idea of having individual music pieces depending on the mood of the scene.

 He then kept me really in the loop each time he made progress. Here's another video he sent of the piano he used for the final recording.


I also got Nicolas to do the sound design for my animation, so each time I made progress on the animation I would render it out and share it with him using Google Drive, that way he could work on each scene as I was animating the next one, which worked really well.

Overall, it has been a really great experience working with Nic and I was lucky enough to get someone who was really into the project!

Art Book & Reflection

I didn't manage to print my art book properly for submission, however in the next couple of weeks I will be sending off for a copy of it! I want to edit the white frames around the images of production, so that it is full pages, so my next steps are to look into the indesign file and sort that out before printing the full book. It was a learning experience to create this art book and was fun to see all of my work come together!

Production Time-Lapse - ANIMATING

This is a time lapse I created, just for fun really! I loved seeing the other time lapse of everything coming together that I wanted to do another one. So, this one is just me animating a few scenes, it was really cool to see how the wire moved in time lapse.

Loopdeloop - Final Result

Lucky Clover from Stacy Straub on Vimeo.

Here is the finished loopdeloop! I got Harry (music student) to create the sounds and flute tune in the background and then using my voice acting, we put together a cute and simple soundtrack. I find that it fits really well with the animation and adds an extra layer to it. I also had to edit out the wire that I used to make the clover fly using Photoshop and cloned it out in each frame, which was really easy to do as it was a plain background. This was a really smooth collaboration and I found it refreshing to work with someone else's puppet instead of my own. I will definitely be looking to collaborate with Jay again as her puppets are so lovely!

Loopdeloop - Lucky Collab & Production

For this final mini brief, I really wanted to collaborate once again with others so that I can get most out of being surrounded by other creatives. I collaborated with an illustration student (puppet maker) and a music student, and my role was the animating and editing. We wanted to keep this idea extremely simple so that it wouldn't take up too much time but would still be a nice side brief and look good in each other portfolios of work! So, I got together with Jay Stelling (the illustration student) and we brainstormed some ideas. We decided together that we liked the idea of a hippie-like girl finding a four leaved clover and then it is blown away in the wind.

So, Jay set out and started building the puppet and I decided that as it was such a simple loop all it needed were a few sketches and didn't need an actual storyboard. I was going to use a plain coloured card for the background, depending on what colours Jay decides to use for the puppet's hair and clothing.

Below are the simple sketches I did.


Below are images of Jay making the puppet.


And here's the finished puppet ready to animate! I am going to use green plasticine for the clover, so that I can easily manipulate it and shape it however I want.


Monday 7 May 2018

Final Crit - Feedback for End of Year Show!

Positives
  • "Cute" characters
  • Understood the narrative
Next Steps
  • Really think carefully about the title sequence - will it set the scene?
  • Rig can be seen, consider clean up
  • Colour Correct
  • Slow down the tears on a certain scene

Wednesday 25 April 2018

Animation Tests

Before I started animating properly I wanted to test out the way that the string moved and if the idea I had would actually work. I thought about animating it digitally, however I really wanted to keep everything similar in material and my strengths as an animator are in stop motion animation.

I decided that I was going to use wire and wrap wool around it to create an illusion of it being very flexible string. I first tried to use medium thickness wire (which is the yellow string test), but it didn't work great as I wasn't able to get it to bend very easily. As this string was going to do a lot of wild and fast movements I needed thinner wire to achieve this.

I then tried again, this time with thin wire (pink string test) and it worked great! I was able to get a lot more movement out of it and I'm really glad I tried out these different test before I began. The string is a vital part of my narrative and needs to move in a way that's believable, yet it can have it's own characteristics and performance.

Here are my tests!

Animation Tests - The Box from Stacy Straub on Vimeo.

Time Lapse of Production

The Box Time Lapse from Stacy Straub on Vimeo.

Tuesday 17 April 2018

Building Puppets - The Box

Wire Armatures

I drew up the correct sizing on paper first, then measured out all of my wire and built my armatures! I decided to use thicker wire for their spines so that they would be extra sturdy.


Milliput Time

I covered their limbs in millput to ensure they bent in the right places and the give the wire some extra support.


All their limbs together, I attached nuts and bolts to create their feet so that they could be magnetised to the set. Also, as my narrative involves the characters losing limbs I had to ensure all of the limbs used K&S brass tubing so they could be replaceable and detachable for the animation.

Sponge them up!

 Here I'm bulking out my puppets with sponge and shaping them to my designs.


Felting

I forgot to document a lot of the felting stage, but it mainly just involved me spraying the sponge with adhesive spray and wrapping the felt around it. Then tidying it all up by sewing the seams.


A little ear, I then glued them onto the sides of the puppet's heads.


Both puppets fully felted, then I added the details.


I actually used beads off an old necklace of mine for the eyes as they happened to be the perfect size! And I wanted them to be shiny/polished.


Finn and April <3


Monday 16 April 2018

Building My Set!

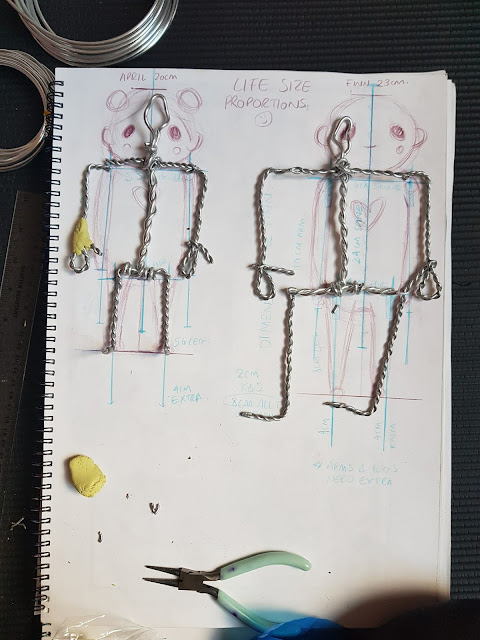
The Design I came up with.
 
 
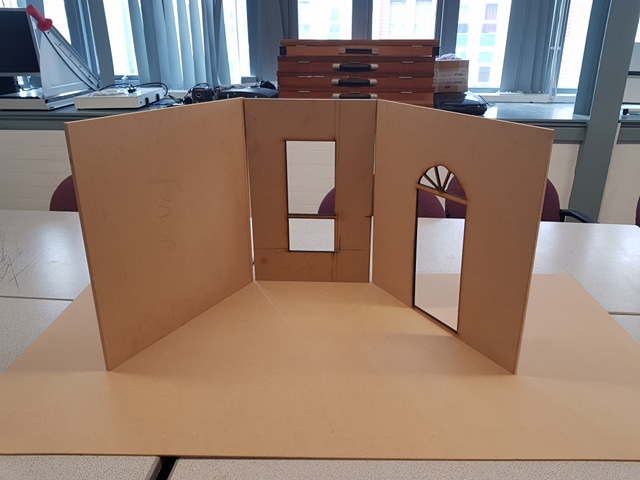
I first began building my set by gathering the wood I needed and then working out the scales of the door and window in Illustrator to then lasercut the wood. This was the most precise way for me to cut the wood into the exact design I wanted, especially considering the window above the door.


I wanted the set to be very stripped back and basic, so I painted each wall with white emulsion. I thought that having a white set and off-white puppets would help emphasise the coloured strings in my animation. 


Here I just saved the cutting from the laser cut and sanded down the sides and created the door from that original piece of wood so it fit pretty much perfect!


I decided on this teal colour for the door, I felt it would compliment the red hearts on the puppets and the colours of the string.


Very basic foamboard hooks for my curtain pole.
 
 Slowly coming together!


Originally, I thought it would be best to use hinges on my set so that I could easily move the walls around and get in and around the set. However, this turned into a problem quickly as I glued the hinges on wrong and made quite a mess of it!


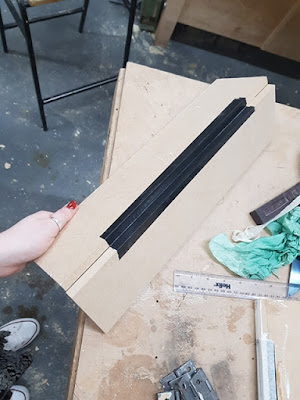
 I managed to solve this problem after a trip down to woodwork to see what they could suggest. They advised me to use a "cloth hinge" instead and that this would work a lot better for the kind of thing I was doing. This is basically making use of duct tape and masking tape to form a hinge out of. I never even knew this existed and above is the first try on some scrap wood to see how it would work.

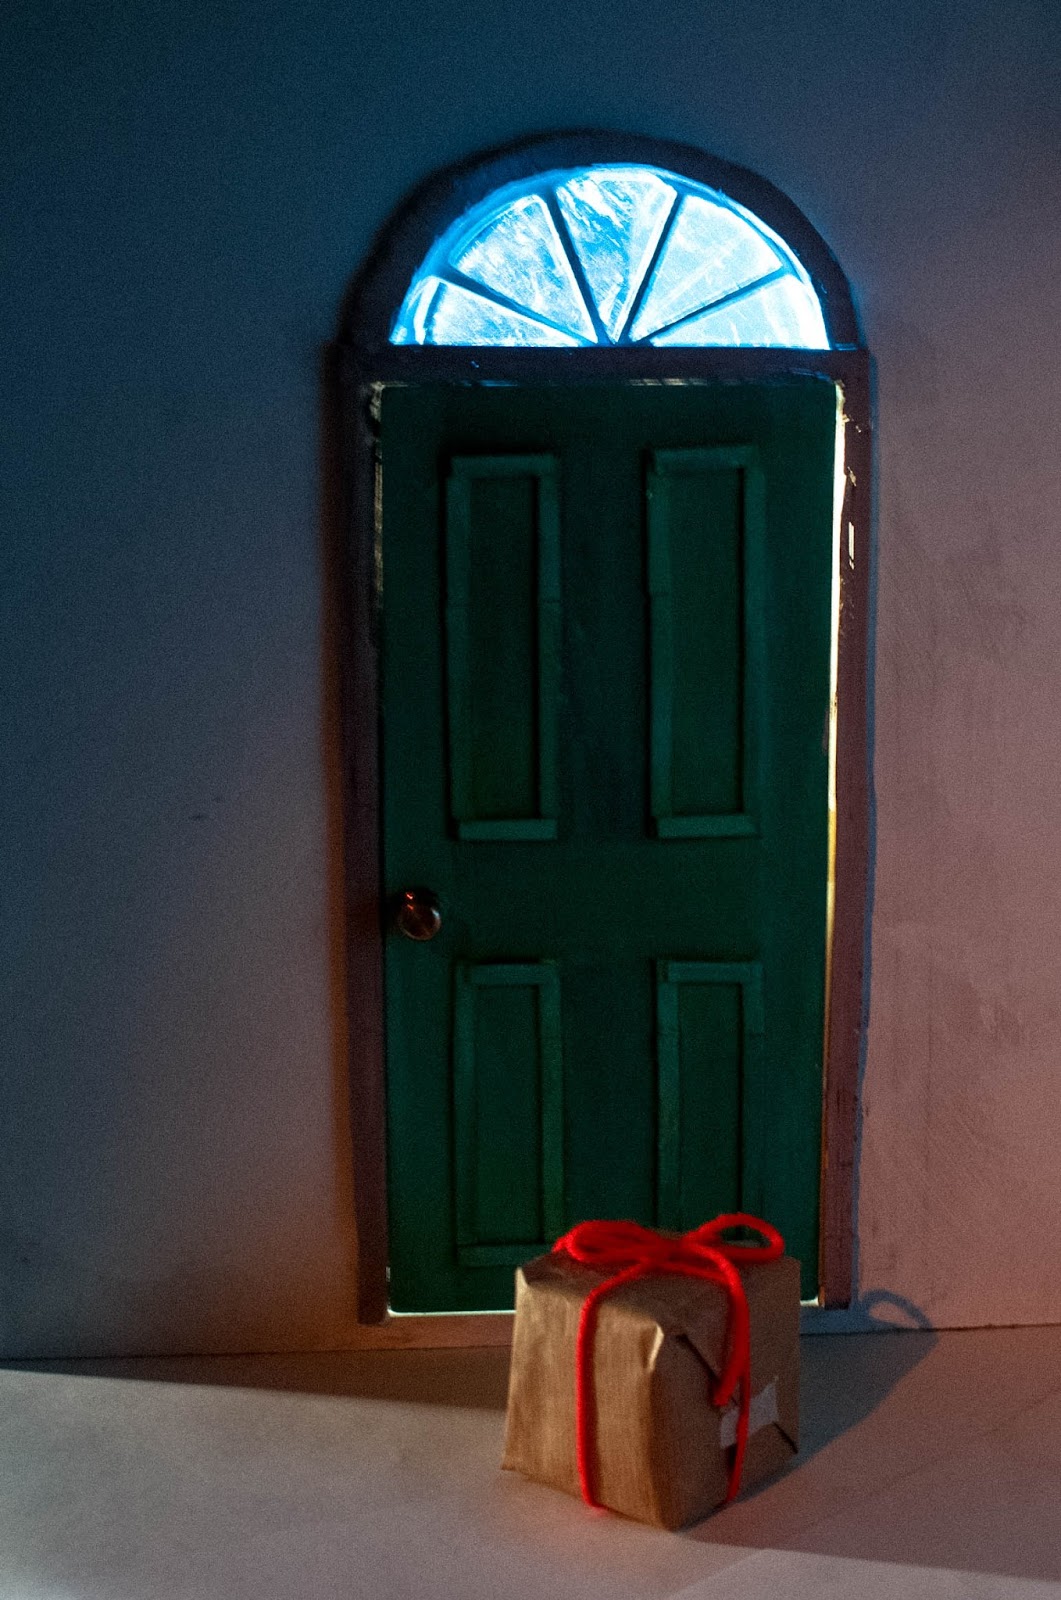
 Here is my final set with lighting! As you can see I painted over the cloth hinges and they are pretty much unnoticeable! I ended up switching the side the door was on so that it would work our better when animating, then when the door opens there is only black instead of seeing the Mac computer.


Dark lighting, I really liked how the light shines through the window above the door creating this blue silhouette on the wall.


The door from the inside.


And outside!

 A still from my animation.